Published on September 27, 2021
Introduction
In the previous article we created a safe framework in Rust for writing Windows kernel drivers with a global allocator, print! and println! macros and boilerplate code to set up the driver_entry and driver_exit functions.
However, up to now our driver has only been printing "Hello, world!" and "Bye bye!" whenever the driver gets loaded and unloaded.
It would be more interesting if we could interact with our driver from userspace.
Therefore, we are going to look at how to create device files in this article and implement a safe abstraction for setting up device files in Rust.
Creating Devices
To create and delete a device we can use the IoCreateDevice and IoDeleteDevice functions respectively.
We will first start with declaring the Device struct wrapping the DEVICE_OBJECT pointer:
pub struct Device {
    pub(crate) raw: *mut DEVICE_OBJECT,
}
Since we want to be able to store the Device as part of the struct implementing the KernelModule, we ideally want it to be thread-safe.
Therefore, we will implement both Send and Sync for the Device, but as we have to use an unsafe impl we have to make sure that our implementation is guaranteed to be thread-safe:
unsafe impl Send for Device {}
unsafe impl Sync for Device {}
Then we can implement the Drop trait for our Device which simply calls IoDeleteDevice on the pointer.
In addition, we will add a check to see if the pointer is not null.
This way we can take ownership of the pointer without it being dropped, which will be useful later on:
impl Drop for Device {
    fn drop(&mut self) {
        if self.raw.is_null() {
            return;
        }

        unsafe {
            IoDeleteDevice(self.raw);
        }
    }
}
It is also helpful to implement some functions to get the raw pointer or turn a raw pointer to a DEVICE_OBJECT into a Device:
impl Device {
    pub unsafe fn from_raw(raw: *mut DEVICE_OBJECT) -> Self {
        Self {
            raw,
        }
    }

    pub unsafe fn as_raw(&self) -> *const DEVICE_OBJECT {
        self.raw as *const _
    }

    pub unsafe fn as_raw_mut(&self) -> *mut DEVICE_OBJECT {
        self.raw
    }

    pub fn into_raw(mut self) -> *mut DEVICE_OBJECT {
        core::mem::replace(&mut self.raw, core::ptr::null_mut())
    }
}
Before we extend our Driver type with a create_device function to create the Device, we will have a look at the arguments of IoCreateDevice.
We can skip over the first two arguments, as the first is the pointer of our Driver type and the second one is the amount of size IoCreateDevice should allocate for user-specific data associated with the Device.
The third argument is a pointer to a UNICODE_STRING containing the device path, so let's create a function that conveniently creates a UNICODE_STRING from a slice of UTF-16 data or &[u16]:
pub fn create_unicode_string(s: &[u16]) -> UNICODE_STRING {
    let len = s.len();

    let n = if len > 0 && s[len - 1] == 0 { len - 1 } else { len };

    UNICODE_STRING {
        Length: (n * 2) as u16,
        MaximumLength: (len * 2) as u16,
        Buffer: s.as_ptr() as _,
    }
}
The fourth argument is the device type.
For the device type we will implement our own enum in Rust, and then implement Into<u32> to map the enum values into the appropriate constants:
#[derive(Clone, Copy, Debug, PartialEq, Eq)]
pub enum DeviceType {
    Port8042,
    Acpi,
    Battery,
    ...
}

impl Into<u32> for DeviceType {
    fn into(self) -> u32 {
        match self {
            DeviceType::Port8042 => windows_kernel_sys::base::FILE_DEVICE_8042_PORT,
            DeviceType::Acpi => windows_kernel_sys::base::FILE_DEVICE_ACPI,
            DeviceType::Battery => windows_kernel_sys::base::FILE_DEVICE_BATTERY,
            ...
        }
    }
}
The fifth argument is a bitwise concatenation of flags that provide information about the driver's device and of which the most common one is FILE_DEVICE_SECURE_OPEN.
We will simply use the bitflags! macro from the bitflags crate to create a DeviceFlags type:
bitflags! {
    pub struct DeviceFlags {
        const SECURE_OPEN = windows_kernel_sys::base::FILE_DEVICE_SECURE_OPEN;
        ...
    }
}
The sixth argument specifies whether access to the device is exclusive or not.
Instead of using a boolean, we will implement an enum to clearly differentiate between Access::NonExclusive and Access::Exclusive:
#[derive(Copy, Clone, Debug, PartialEq, Eq)]
pub enum Access {
    NonExclusive,
    Exclusive,
}

impl Access {
    pub fn is_exclusive(&self) -> bool {
        match *self {
            Access::Exclusive => true,
            _ => false,
        }
    }
}
Finally, the seventh argument is a pointer to a pointer of the DEVICE_OBJECT, such that the function can give us a pointer to the allocated DEVICE_OBJECT.
Now that we have gone over all the arguments and provided safe Rust abstractions for them, we can start implementing Driver::create_device():
impl Driver {
    pub fn create_device(
        &mut self,
        name: &str,
        device_type: DeviceType,
        device_flags: DeviceFlags,
        access: Access,
    ) -> Result<Device, Error> {
        // Convert the name to UTF-16 and then create a UNICODE_STRING.
        let name = U16CString::from_str(name).unwrap();
        let mut name_ptr = create_unicode_string(name.as_slice());

        // Create the device.
        let mut device = core::ptr::null_mut();

        let status = unsafe {
            IoCreateDevice(
                self.raw,
                0,
                &mut name_ptr,
                device_type.into(),
                device_flags.bits(),
                access.is_exclusive() as _,
                &mut device,
            }
        };

        if status != STATUS_SUCCESS {
            return Err(error::from_kernel_errno(status));
        }

        Ok(Device {
            raw: device,
        });
    }
}
Associating User Data
While we now have an API that allows us to create and drop device files, there is not much useful we can do with them yet.
However, we will first have a look at associating user data with the device before we can actually deal with providing our own implementation for the device file operations.
Ideally, we want to be able to define our own type that implements a trait and associate that with our device.
We will call this trait DeviceOperations for reasons that will be more obvious later on, but for now we will leave it empty other than requiring it to be Sync and Sized:
pub trait DeviceOperations: Sync + Sized {
}
If we look back at IoCreateDevice, then we can see that the second argument allows us to specify an arbitrary size for IoCreateDevice to allocate extra storage for user-specific data.
We will be using this to store the data that the user wants to associate with the device.
More specifically, we will use this extra storage to store a virtual table, i.e. a reference to a struct of function pointers, and a void pointer that points to the user data:
#[repr(C)]
pub struct DeviceExtension {
    pub(crate) vtable: *const device_operations,
    pub(crate) data: *mut cty::c_void,
}
In addition, we will extend impl Device with functions to access the DeviceExtension as well as the vtable and the user data:
    pub(crate) fn extension(&self) -> &DeviceExtension {
        unsafe {
            &*((*self.raw).DeviceExtension as *const DeviceExtension)
        }
    }

    pub(crate) fn extension_mut(&self) -> &mut DeviceExtension {
        unsafe {
            &mut *((*self.raw).DeviceExtension as *mut DeviceExtension)
        }
    }

    pub(crate) fn vtable(&self) -> &device_operations {
        unsafe {
            &*(self.extension().vtable as *const _)
        }
    }

    pub fn data<T: DeviceOperations>(&self) -> &T {
        unsafe {
            &*(self.extension().data as *const T)
        }
    }

    pub fn data_mut<T: DeviceOperations>(&self) -> &mut T {
        unsafe {
            &mut *(self.extension().data as *mut T)
        }
    }
We can then extend Driver::create_device to accept user data of type T that must implement the DeviceOperations trait.
Since we want to associate it with the device, we must ensure that it will live at least as long as the device itself.
Therefore we will box it up using Box::new from alloc::boxed::Box.
Then we can turn the Box into a raw pointer and store that pointer into the extra allocated storage for DeviceExtension.
With these changes, our Driver::create_device function looks a bit like the following:
impl Driver {
    pub fn create_device<T>(
        &mut self,
        name: &str,
        device_type: DeviceType,
        device_flags: DeviceFlags,
        access: Access,
        data: T,
    ) -> Result<Device, Error>
    where
        T: DeviceOperations
    {
        // Box the data.
        let data = Box::new(data);

        ...

        let status = unsafe {
            IoCreateDevice(
                self.raw,
                core::mem::size_of::<DeviceExtension>() as u32,
                &mut name_ptr,
                device_type.into(),
                device_flags.bits(),
                access.is_exclusive() as _,
                &mut device,
            }
        };

        if status != STATUS_SUCCESS {
            return Err(error::from_kernel_errno(status));
        }

        let device = unsafe { Device::from_raw(device) };

        // Store the boxed data and vtable.
        let extension = device.extension_mut();
        extension.vtable = &DeviceOperationsVtable::<T>::VTABLE;
        extension.data = Box::into_raw(data) as *mut cty::c_void;

        Ok(device)
    }
}
In the above code you may notice that we are already setting up the vtable, but what is the purpose of this vtable?
Well, we will need it later on to handle any of the operations on the device file, but there is another issue we have to solve.
The Driver::create_device function currently takes an argument called data of type T and then decides to Box it and store the raw pointer to Box<T> as part of the device extension data, but when we drop the Device we also have to drop this boxed data.
Unfortunately, the Drop implementation of Device does not know what the original type T is, but it has to know that in order to call the appropriate Drop implementation.
However, we can generate a unique vtable for each type T which means that the function pointers in our vtable point to functions that are aware of what T is.
We will first declare device_operations with a release function pointer that accepts a pointer to the DEVICE_OBJECT:
#[repr(C)]
pub struct device_operations {
    release: Option<extern "C" fn (*mut DEVICE_OBJECT)>,
}
Then we will create our release_callback function which accesses the device extension of the DEVICE_OBJECT, swaps out the pointer with a NULL pointer and converts the swapped out raw pointer back into the original Box<T>.
Then as the function goes out of scope, the Box<T> will be dropped, invoking the right Drop implementation for our user data:
extern fn release_callback<T: DeviceOperations>(
    device: *mut DEVICE_OBJECT,
) {
    unsafe {
        let extension = (*device).DeviceExtension as *mut DeviceExtension;

        let ptr = core::mem::replace(&mut (*extension).data, core::ptr::null_mut());
        Box::from_raw(ptr as *mut T);
    }
}
Then we declare the DeviceOperationsVtable<T> struct, which is simply an empty struct, except that if we are not using T in any of the struct members, we have to use a PhantomData marker:
pub(crate) struct DeviceOperationsVtable<T>(core::marker::PhantomData<T>);
We can then define a VTABLE constant with the corresponding device_operations struct for T.
impl <T: DeviceOperations> DeviceOperationsVtable<T> {
    pub(crate) const VTABLE: device_operations = device_operations {
        release: Some(release_callback::<T>),
    };
}
As we can see in the code above, we set the release function pointer to release_callback::<T>, which means the function pointer now points to the release_callback operating on T.
In our Driver::create_device function, we set the vtable to &DeviceOperatonsVtable::<T>::VTABLE.
In other words, we point the vtable of the device to the vtable that operates on T.
Since the user calls the Driver::create_device function with an actual user defined type such as MyDevice, the vtable will end up pointing to a VTABLE that operates on MyDevice and thus the release function pointer will point to release_callback::<MyDevice>.
That essentially means that the release_callback function will cast the raw pointer back into a Box<MyDevice> and invoke the Drop implementation of MyDevice.
All that is left to do for us to complete this implementation, is to take the vtable in the Drop implementation of Device and then invoke the release function pointer before calling IoDeleteDevice:
impl Drop for Device {
    fn drop(&mut self) {
        if self.raw.is_null() {
            return;
        }

        unsafe {
            let extension = (*self.raw).DeviceExtension as *mut DeviceExtension;
            let vtable = (*extension).vtable;

            if let Some(release) = (*vtable).release {
                release(self.raw);
            }

            IoDeleteDevice(self.raw);
        }
    }
}
Handling Userspace Operations
The entire point of creating a device file is such that userspace can interact with our device.
For an application to actually do anything with our device file, it will have to call CreateFile and DeleteFile, which we then have to handle from our driver.
On the driver side, these functions will ultimately invoke the function pointers in MajorFunction[IRP_MJ_CREATE] and MajorFunction[IRP_MJ_CLOSE] that are part of the DRIVER_OBJECT.
That means we first have to change the driver_entry function in our kernel_module! macro to set up these function pointers.
We will simply point all possible major functions to the same function, which we will call dispatch_device:
for i in 0..$crate::IRP_MJ_MAXIMUM_FUNCTION {
    driver.MajorFunction[i as usize] = Some($crate::dispatch_device);
}
The dispatch_device has two arguments, of which the first is a pointer to the DEVICE_OBJECT and the second is a pointer to the IRP struct, where IRP is short for I/O request packet.
When we open or close the device file from userspace, the I/O request will generally pass through a number of operating system components and drivers, each them calling IoCallDriver to pass the I/O request to the next.
Therefore, as the I/O request goes through the device stack, the IRP ends up being a stack of I/O requests.
We will first create an IoRequest type to wrap the IRP pointer:
pub struct IoRequest {
    raw: *mut IRP,
}

impl IoRequest {
    pub unsafe fn from_raw(irp: *mut IRP) -> Self {
        Self { raw: irp }
    }

    pub fn as_raw(&self) -> &IRP {
        unsafe { &*self.raw }
    }

    pub fn as_raw_mut(&self) -> &mut IRP {
        unsafe { &mut *self.raw }
    }

    pub fn stack_location(&self) -> &IO_STACK_LOCATION {
        unsafe { &*IoGetCurrentIrpStackLocation(self.irp_mut()) }
    }

    pub fn major(&self) -> u8 {
        self.stack_location().MajorFunction
    }
}
Our dispatch_device function will first use IoGetCurrentIrpStackLocation to get the data associated with the I/O request, more specifically the major function.
Then it can dispatch the request to handler of the corresponding device.
then handle the request and to indicate that the request has been completed it will invoke IoCompleteRequest.
There will be three types of I/O request we will currently be handling, which are:
IRP_MJ_CREATE: userspace opened a handle to the device file.IRP_MJ_CLOSE: userspace closed the handle to the device file.IRP_MJ_CLEANUP: the reference count reached zero, i.e. all handles to the device file have been closed.
Let's first extend the DeviceOperations trait to handle these:
pub trait DeviceOperations: Sync + Sized {
    fn create(&mut self, _device: &Device: request: &IoRequest) -> Result<(), Error> {
        request.complete(Ok(0));

        Ok(())
    }

    fn close(&mut self, _device: &Device, request: &IoRequest) -> Result<(), Error> {
        request.complete(Ok(0));

        Ok(())
    }

    fn cleanup(&mut self, _device: &Device, request: &IoRequest) -> Result<(), Error> {
        request.complete(Ok(0));

        Ok(())
    }
}
As you can see in the functions above, we simply mark the I/O requests as completed.
The complete functions simply sets the Information and Status fields of IoStatus in the IRP struct, and then invokes IoCompleteRequest.
The Information field contains the number of bytes returned, whereas the Status field contains the success or failure status of the I/O request.
The complete function is implemented as follows:
    pub fn complete(&self, value: Result<u32, Error>) {
        let irp = self.irp_mut();

        match value {
            Ok(value) => {
                irp.IoStatus.Information = value as _;
                irp.IoStatus.__bindgen_anon_1.Status = STATUS_SUCCESS;
            }
            Err(error) => {
                irp.IoStatus.Information = 0;
                irp.IoStatus.__bindgen_anon_1.Status = error.to_kernel_errno();
            }
        }

        unsafe {
            IoCompleteRequest(irp, IO_NO_INCREMENT as _);
        }
    }
Now we can also extend our virtual table device_operations by adding a dispatch callback that takes a pointer to the DEVICE_OBJECT, a pointer to the IRP and the major function:
#[repr(C)]
pub struct device_operations {
    dispatch: Option<extern "C" fn (*mut DEVICE_OBJECT, *mut IRP, u8) -> NTSTATUS>,
    release: Option<extern "C" fn (*mut DEVICE_OBJECT)>,
}
In this callback we will basically wrap the pointers into Device and IoRequest as we don't want the user to have direct access to these pointers.
Using Device we can access the user data which implements the DeviceOperations trait, and therefore we can map the major function code to the corresponding function in that trait and call that function.
To prevent the Drop implementation of Device from dropping the DEVICE_OBJECT, we use into_raw() to take the pointer and swap it with a NULL pointer.
The code looks like this:
extern "C" fn dispatch_callback<T: DeviceOperations>(
    device: *mut DEVICE_OBJECT,
    irp: *mut IRP,
    major: u8,
) -> NTSTATUS {
    let device = unsafe { Device::from_raw(device) };
    let data: &mut T = device.data_mut();
    let request = unsafe { IoRequest::from_raw(irp) };

    let status = match major as _ {
        IRP_MJ_CREATE => data.create(&device, &request),
        IRP_MJ_CLOSE => data.close(&device, &request),
        IRP_MJ_CLEANUP => data.cleanup(&device, &request),
        _ => {
            request.complete(Err(Error::INVALID_PARAMETER));
            Err(Error::INVALID_PARAMETER)
        }
    };

    device.into_raw();

    match status {
        Ok(()) => STATUS_SUCCESS,
        Err(e) => {
            let status = e.to_kernel_errno();
            request.complete(Err(e));
            status
        }
    }
}
With the dispatch callback implemented, we can then extend the VTABLE constant:
impl<T: DeviceOperations> DeviceOperationsVtable<T> {
    pub(crate) const VTABLE: device_operations = device_operations {
        dispatch: Some(dispatch_callback::<T>),
        release: Some(release_callback::<T>),
    };
}
Now all that is left is the actual implementation of the dispatch_device function.
First, we will use IoGetCurrentIrpStackLocation to get the associated data of the I/O request.
In addition, we wrap the pointer to the DEVICE_OBJECT into a Device, so we can easily access the vtable.
We then simply dispatch the request to the dispatch callback.
pub extern "C" fn dispatch_device(
    device: *mut DEVICE_OBJECT,
    irp: *mut IRP,
) -> NTSTATUS {
    let stack_location = unsafe { &*IoGetCurrentIrpStackLocation(irp) };
    let device = unsafe { Device::from_raw(device) };
    let vtable = device.vtable();

    match vtable.dispatch {
        Some(dispatch) => dispatch(device.into_raw(), irp, stack_location.MajorFunction),
        _ => {
            device.into_raw(),
            STATUS_SUCCESS
        }
    }
}
That concludes our dispatch_device function.
Symbolic Links
There is just one more issue and that is when we create our device, it will have an internal Windows NT name like \Device\Example, but that won't be accessible to userspace at all.
In order for our device to be accessible to userspace, it needs a path that lives in the global namespace.
Such a path looks something like the following: \??\Example and we simply can create a symbolic link to \Device\Example.
Fortunately, compared to the rest we have implemented thus far, implementing the code to create and delete symbolic links is rather trivial.
We just need to wrap the IoCreateSymbolicLink and IoDeleteSymbolicLink functions:
pub struct SymbolicLink {
    name: U16CString,
}

impl SymbolicLink {
    pub fn new(name: &str, target: &str) -> Result<Self, Error> {
        // Convert the name to UTF-16 and then create a UNICODE_STRING.
        let name = U16CString::from_str(name).unwrap();
        let mut name_ptr = create_unicode_string(name.as_slice());

        // Convert the target to UTF-16 and then create a UNICODE_STRING.
        let target = U16CString::from_str(target).unwrap();
        let mut target_ptr = create_unicode_string(target.as_slice());

        let status = unsafe {
            IoCreateSymbolicLink(&mut name_ptr, &mut target_ptr)
        };

        if status != STATUS_SUCCESS {
            return Err(Error::from_kernel_errno(status));
        }

        Ok(Self {
            name,
        })
    }
}

impl Drop for SymbolicLink {
    fn drop(&mut self) {
        let mut name_ptr = create_unicode_string(self.name.as_slice());

        unsafe {
            IoDeleteSymbolicLink(&mut name_ptr);
        }
    }
}
The code above mostly has to deal with the usual Unicode conversions as we have seen before and simply stores the path of the symbolic link, such that we can call IoDeleteSymbolicLink in our Drop implementation.
Extending our Example
Wow, that was a lot we had to go through to, but now we have a nice and clean API to use to create and delete devices. Let's extend our driver example and set up our own device that is visible to userspace. We won't do much interesting other than print whenever an application opens or closes a handle to our device file and mark the I/O request as completed:
struct MyDevice;

impl DeviceOperations for MyDevice {
    fn create(&mut self, _device: &Device, request: &IoRequest) -> Result<(), Error> {
        println!("userspace opened the device");

        request.complete(Ok(0));

        Ok(())
    }

    fn close(&mut self, _device: &Device, request: &IoRequest) -> Result<(), Error> {
        println!("userspace closed the device");

        request.complete(Ok(0));

        Ok(())
    }

    fn cleanup(&mut self, _device: &Device, request: &IoRequest) -> Result<(), Error> {
        println!("device is no longer in use by userspace");

        request.complete(Ok(0));

        Ok(())
    }
}
First we declared MyDevice which is the user associated data for our Device and implemented the create, close and cleanup functions to print messages when an application interacts with our device file.
We then create the device file and the symbolic link in our Module:
struct Module {
    _device: Device,
    _symbolic_link: SymbolicLink,
}

impl KernelModule for Module {
    fn init(mut driver: Driver, _: &str) -> Result<Self, Error> {
        let device = driver.create_device(
            "\\Device\\Example",
            DeviceType::Unknown,
            DeviceFlags::SECURE_OPEN,
            Access::NonExclusive,
            MyDevice,
        )?;
        let symbolic_link = SymbolicLink::new("\\??\\Example", "\\Device\\Example")?;

        Ok(Module {
            _device: device,
            _symbolic_link: symbolic_link,
        })
    }
}
As usual, the code can also be found at Github.
Testing
Run both WinObj.exe and DebugView.exe in the background.
In WinObj.exe, click on Driver on the left.
Then create and start the driver service:
sc create example binPath=$(realpath target/x86_64-pc-windows-msvc/debug/driver.sys) type=kernel
sc start example
This should show the Example device in WinObj.exe as shown in Figure 1.
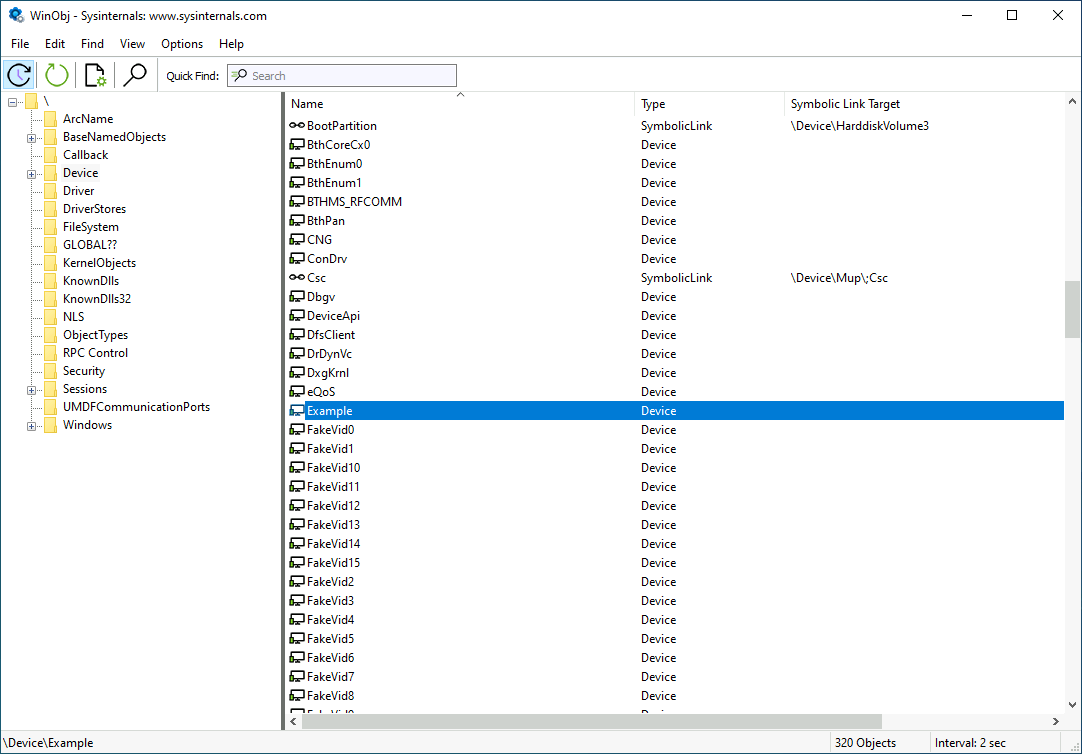
Figure 1: WinObj.exe should show the "Example" device.
Right-click on the Example device in WinObj.exe and then click on Properties... Then a dialog window should appear with the properties of the device. Simply click on OK to close it. This interaction should show the messages from our driver as shown in Figure 2.
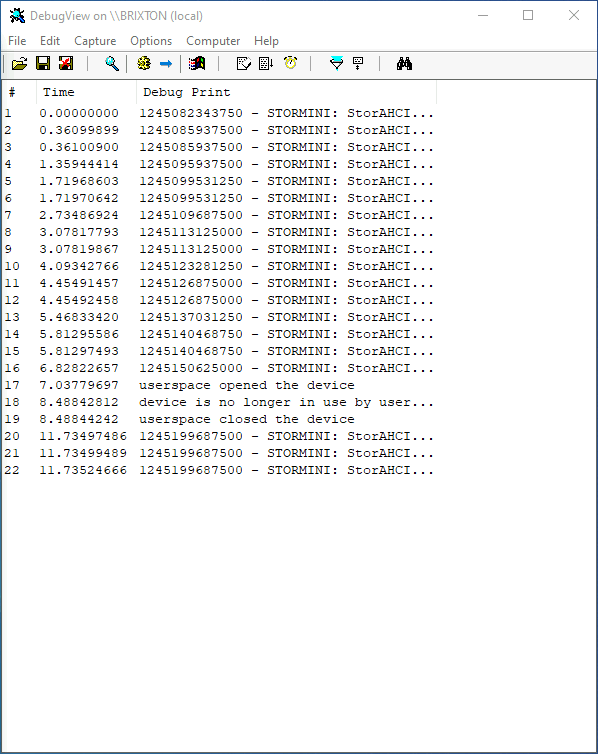
Figure 2: Output in DebugView.exe after interacting with the "Example" device.
If we go to WinObj.exe and click on GLOBAL?? on the left, it should also show the Example device with a symbolic link to \Device\Example.
Userspace
Instead of relying on WinObj.exe, we can also write our own userspace program in Rust to open and close the device file.
It's actually very simple to do that:
use std::fs::File;

fn main() -> Result<(), std::io::Error> {
    let _file = File::open("\\??\\Example")?;

    Ok(())
}
While the above program does not much other than opening and closing the device file, it will become very useful in later tutorials as we will be extending our device file implementation.
Running the above program will produce similar messages in DebugView.exe as interacting with our driver using WinObj.exe.
The above user code can also be found on Github.
What's Next?
In the next article we will look at how to extend our device with read and write callbacks such that we can handle reads from and writes to our device files from userspace.
References
IoCreateDevice- MSDNIoDeleteDevice- MSDN- "Specifying Device Types" - MSDN
IoGetCurrentIrpStackLocation- MSDNIoCompleteRequest- MSDN- "I/O Request Packets" - MSDN
IoCreateSymbolicLink- MSDNIoDeleteSymbolicLink- MSDN
If you like my work or if my work has been useful to you in any way, then feel free to donate me a cup of coffee. Any donation is much appreciated!